Provider Web Portal Quick Guide: Revalidation
All providers must revalidate at least every five (5) years to continue participation in Health First Colorado (Colorado's Medicaid program) and Child Health Plan Plus (CHP+).
Much of the information needed for revalidation will be pre-populated, and providers should verify that the information is still valid. Required fields that are not pre-populated must be completed. Once the revalidation application has been approved, information that cannot be updated in the revalidation application may be updated through the Provider Maintenance option of the Provider Web Portal.
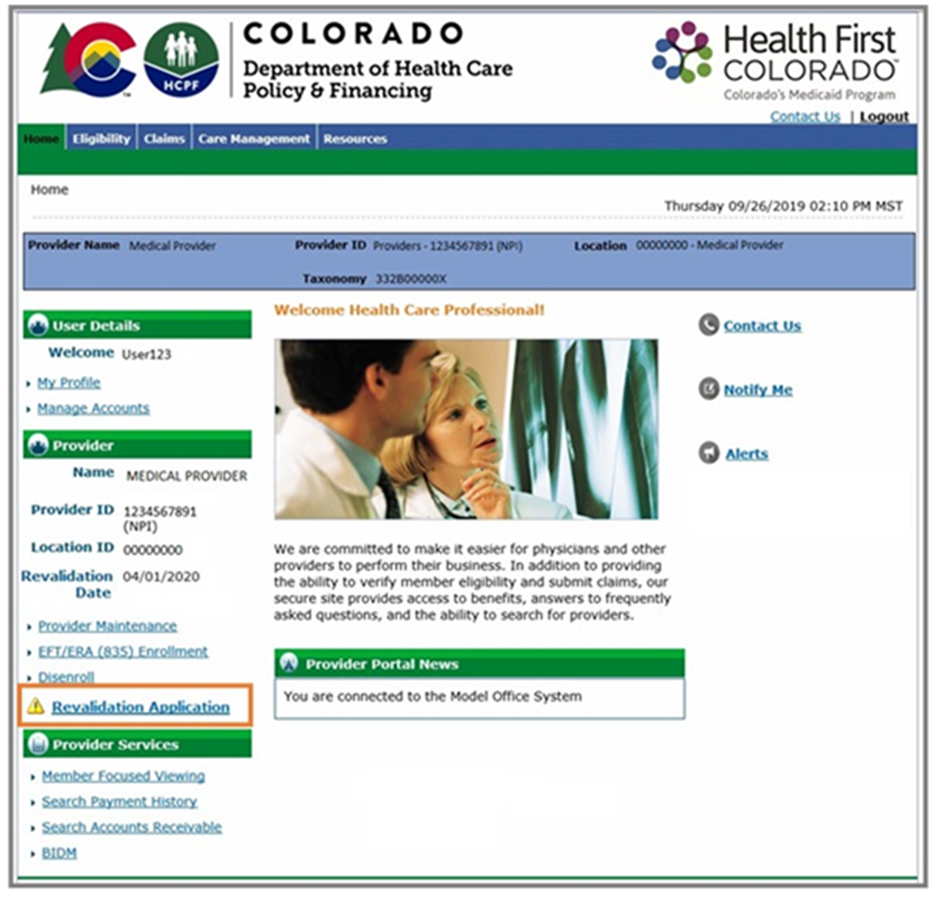
- Log in to the Provider Web Portal.
Click Revalidation Application to be directed to the Revalidation Status panel.
Click the Continue button to be directed to the Revalidation: Request Information panel and begin the revalidation application.
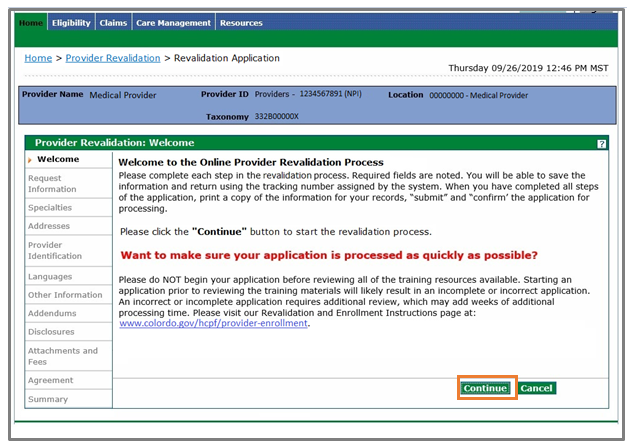
Note: The Continue button will appear throughout the revalidation application and may be used to navigate to the next panel in the application and to save data entered on each panel. The Finish Later button may be used to save the application to complete later.
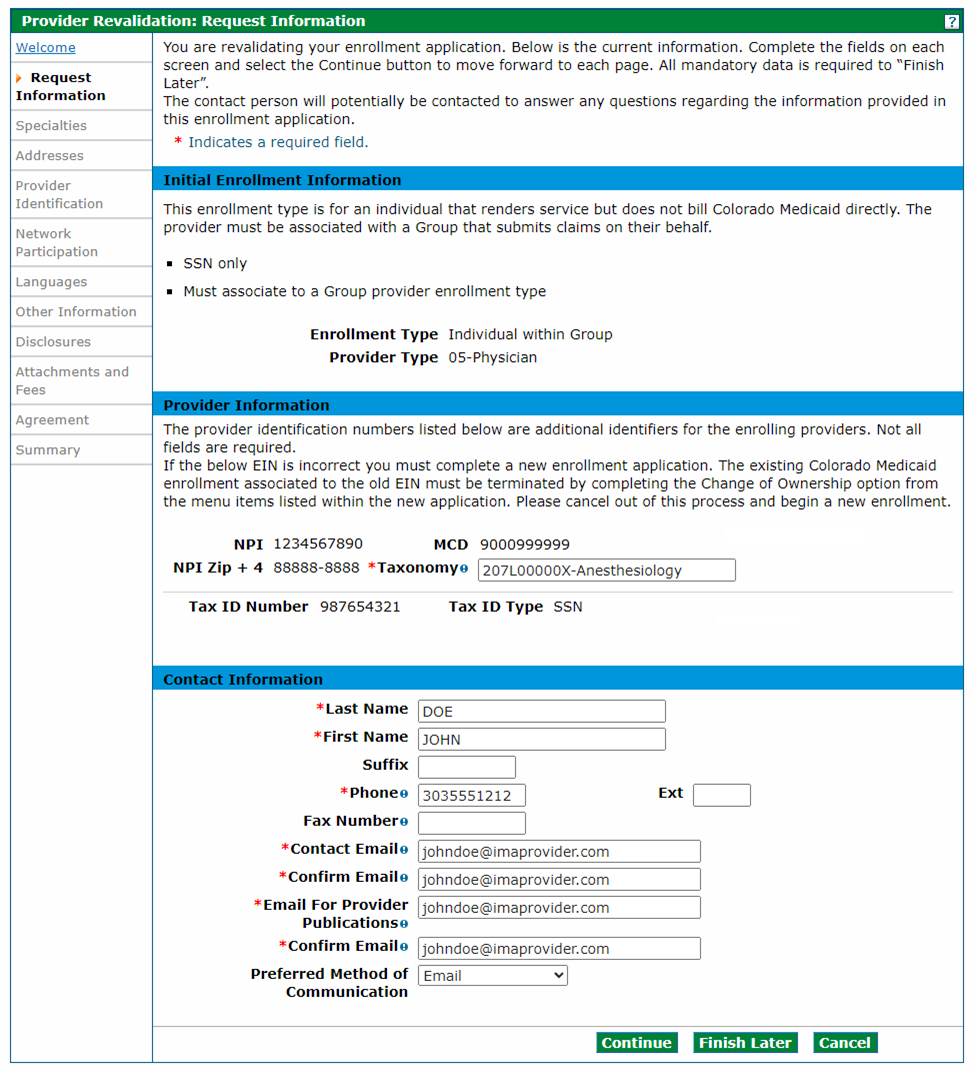
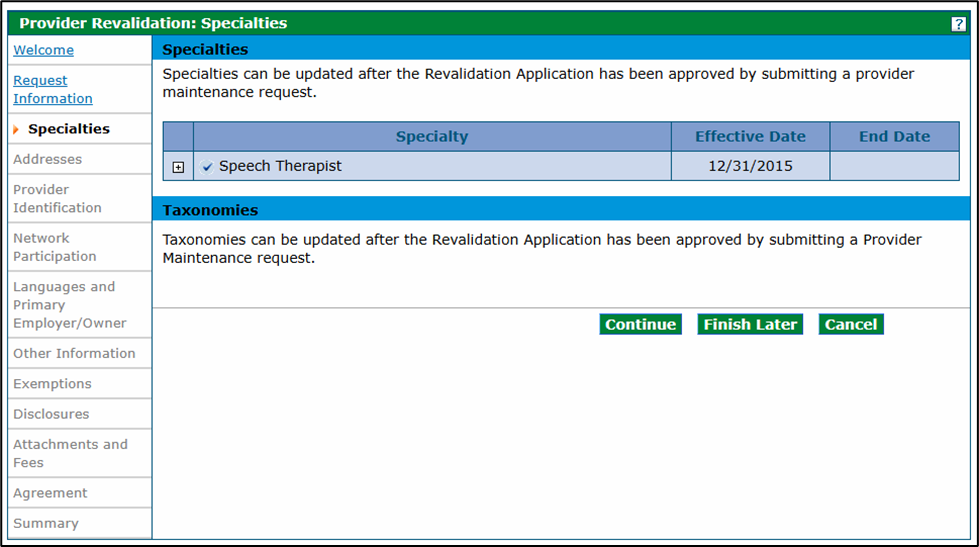
- Verify the Taxonomy in Provider Information.
Note: Providers cannot continue with the revalidation process if the taxonomies on file do not match at least one of the taxonomies listed in the National Plan and Provider Enumeration System (NPPES) NPI Registry.
- Add the Contact Information and ensure it is current. The contact person may potentially be asked to answer questions regarding the revalidation application.
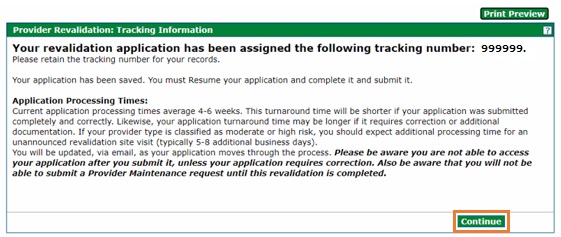
- Click the Continue button to save the updates and to obtain a tracking number.
Retain the tracking number, then click Continue to move to the Specialties panel.
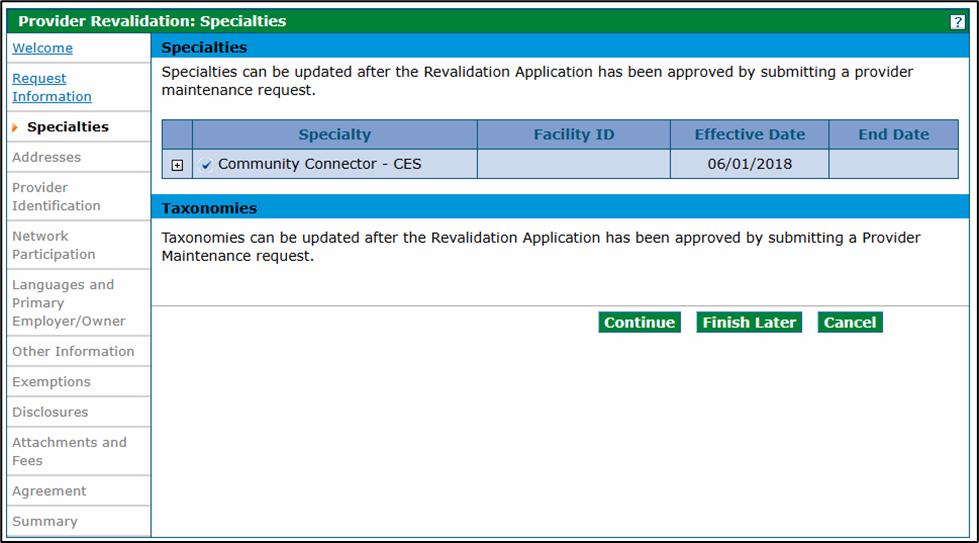
Note: Providers have read-only access to the Specialties and Taxonomies sections within the revalidation application and cannot update this information.
Note: Home & Community Based Services (HCBS) providers will see a Facility ID column. HCBS providers can locate their assigned Facility ID on their issued Certificate & Transmittal (C&T) from the Colorado Department of Public Health and Environment (CDPHE). Only providers that are required to possess a C&T will have a Facility ID.
- Click the Continue button to move to the Addresses panel.
- Ensure the address information is correct for the Service Location, Mailing and Billing addresses.
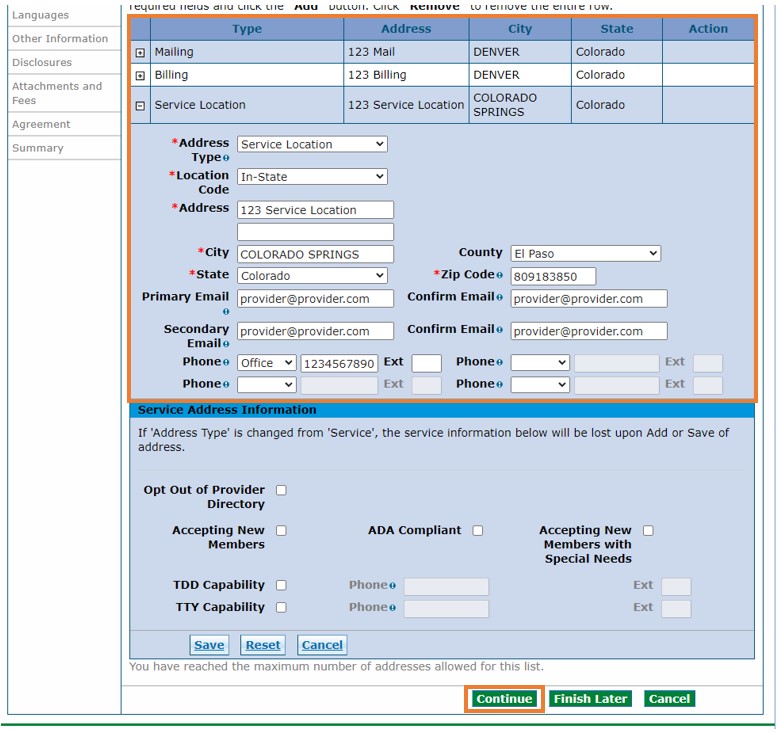
- Click the Continue button to move to the Provider Identification panel.
Note: Providers have read-only access to the Provider Legal Name and Organization Type. Providers must select at least one (1) payer and will be required to view and electronically sign a Provider Participation Agreement (PPA) specific to each payer selected.
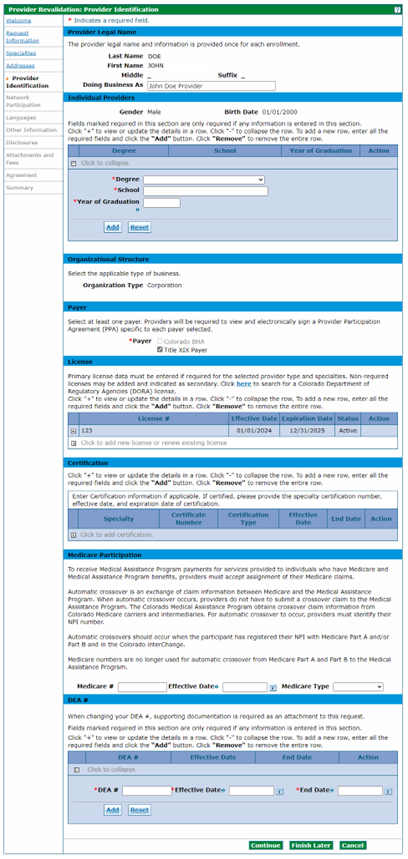
Providers may also:
Update the Doing Business As (DBA) name.

Add Durable Medical Equipment Information.

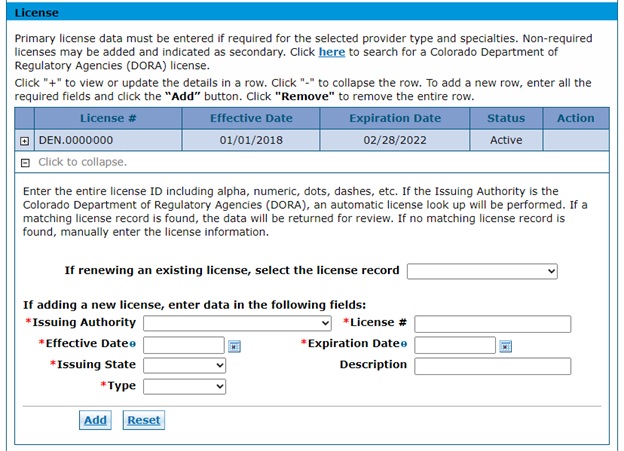
- Add new licenses
- Renew current licenses.
- View existing licenses and update the End Date for existing licenses.
Note: An automatic lookup will be performed when the Issuing Authority and License # are entered if the license is Colorado Department of Regulatory Agencies (DORA). The Effective Date, Expiration Date and Issuing State will be retrieved and populated automatically if a match is found in DORA.
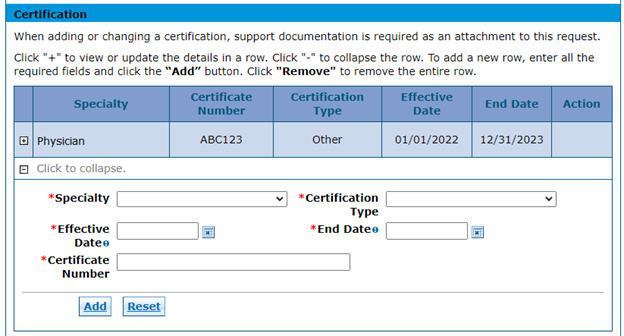
View, add and update Certification information.
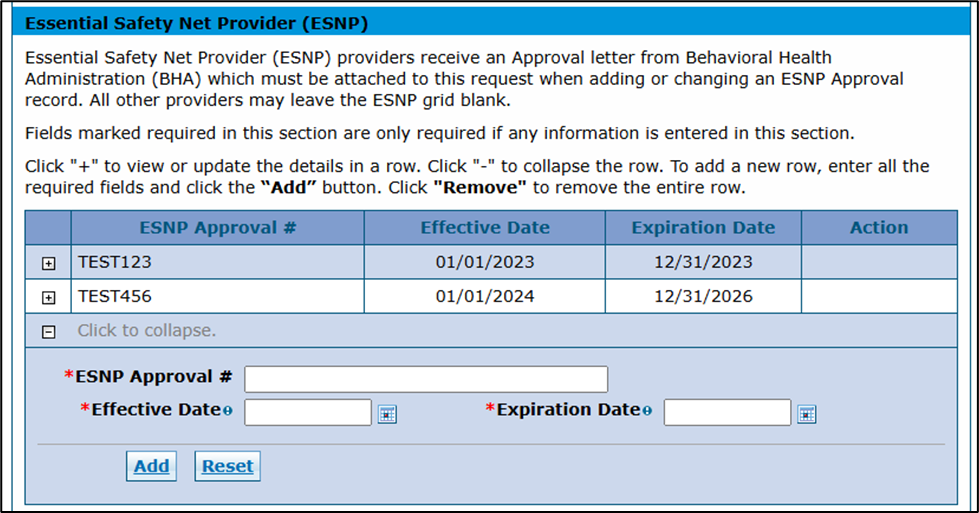
- View, add and update Essential Safety Net Provider (ESNP) information.
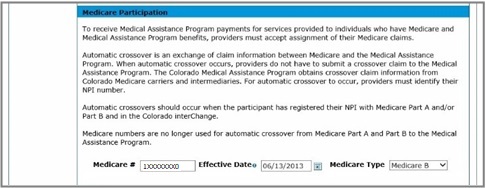
View, add and update Medicare Participation information.
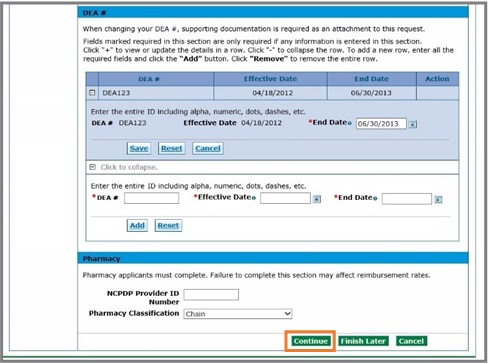
View and add new, non-overlapping Drug Enforcement Administration (DEA) records and add an End Date for existing records.
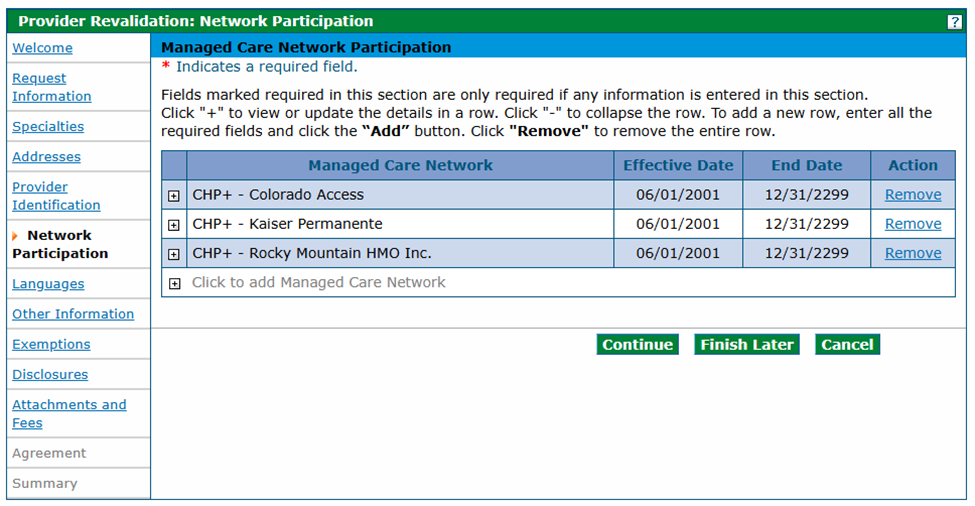
Add, update and view managed care networks.
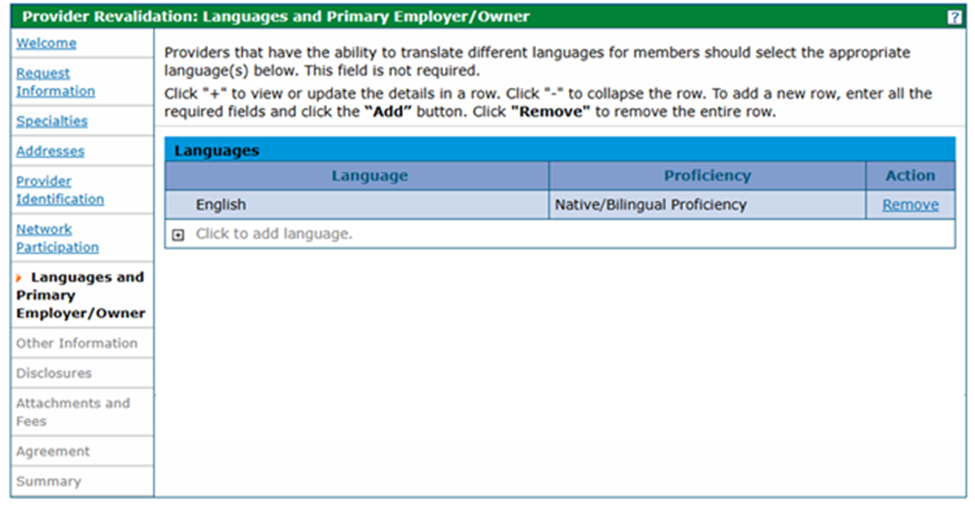
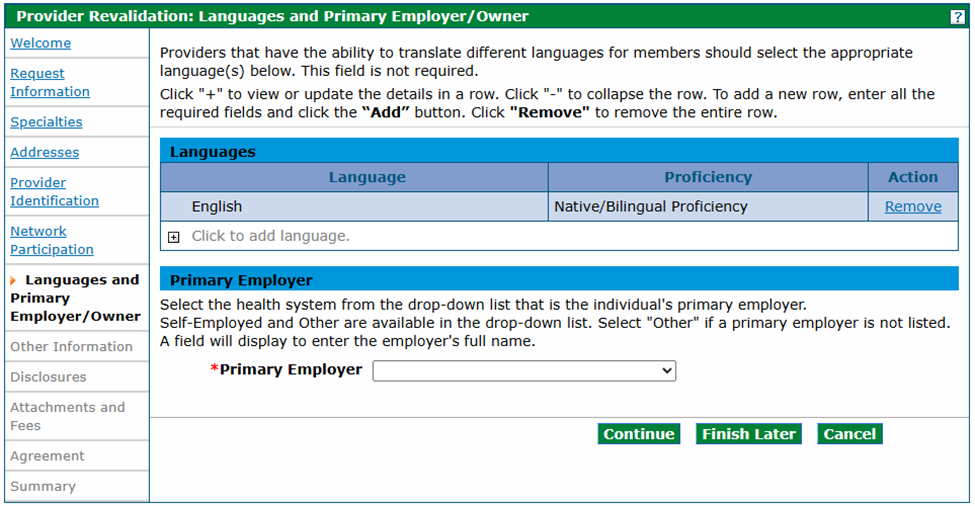
Click the Continue button to move to the Languages and Primary Owner/Employer panel to add, update and view languages or to add, update and view a Primary Owner or Primary Employer.
Group and facility providers are required to select a Primary Owner from the drop-down list.
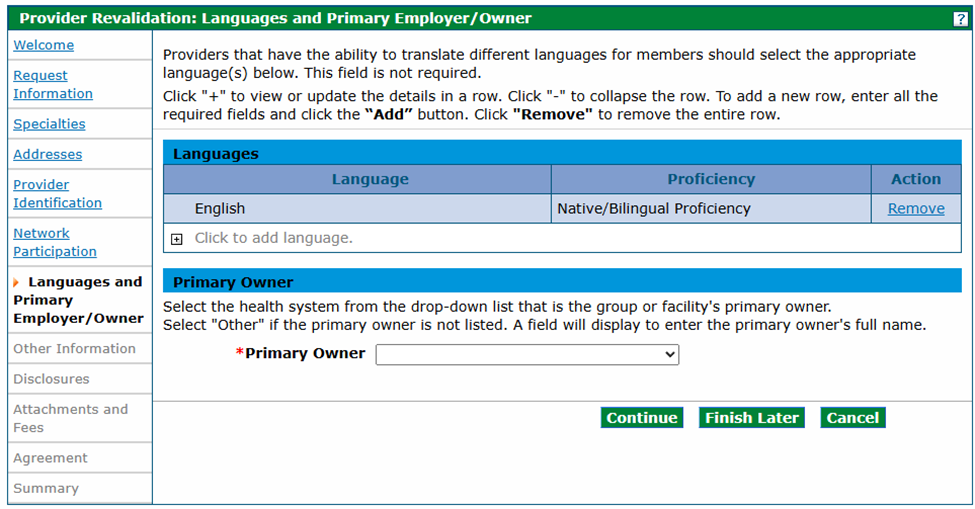
Ordering, Prescribing and Referring and Individual Within a Group providers are required to select a Primary Employer from the drop-down list.
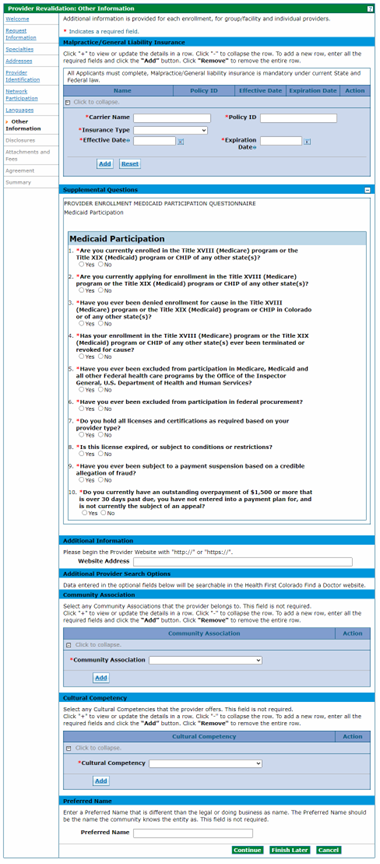
- Click the Continue button to move to the Other Information panel.
- View, update and add Malpractice/General Liability Insurance records.
- View and answer the Supplemental Questions.
- Add a Website Address under the Additional Information section.
View, add and update Additional Provider Search options.
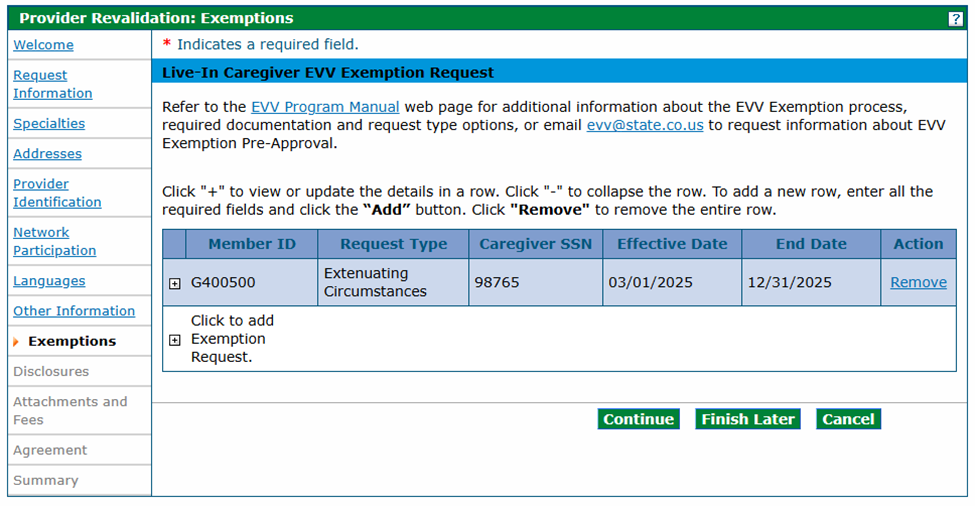
- Click the Continue button to move to the Exemptions panel. Search for, view, update and add EVV Exemption records.
Note: Not all providers will see the Exemptions panel. The Member ID must belong to a Health First Colorado member. The Electronic Visit Verification Attestation of Exemption Form is required to be completed and submitted with supporting documentation for each exemption request.
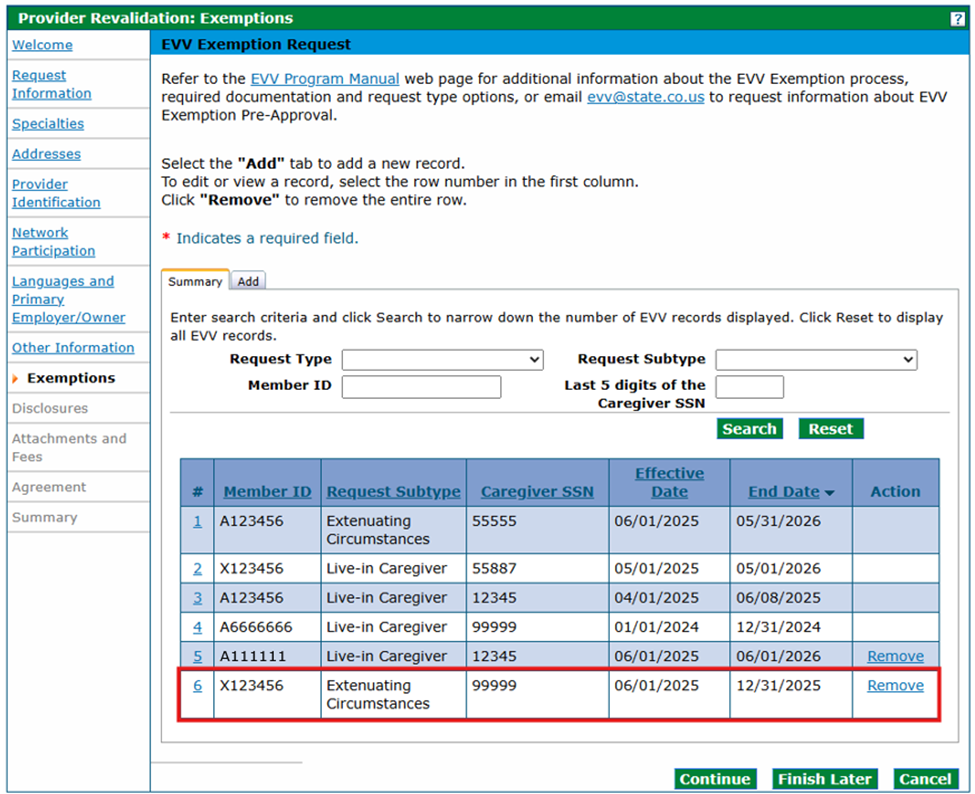
The top section of the page contains optional search fields that will narrow down the records displayed. One or more search fields can be utilized. Click Reset to display all EVV records for the logged in provider.
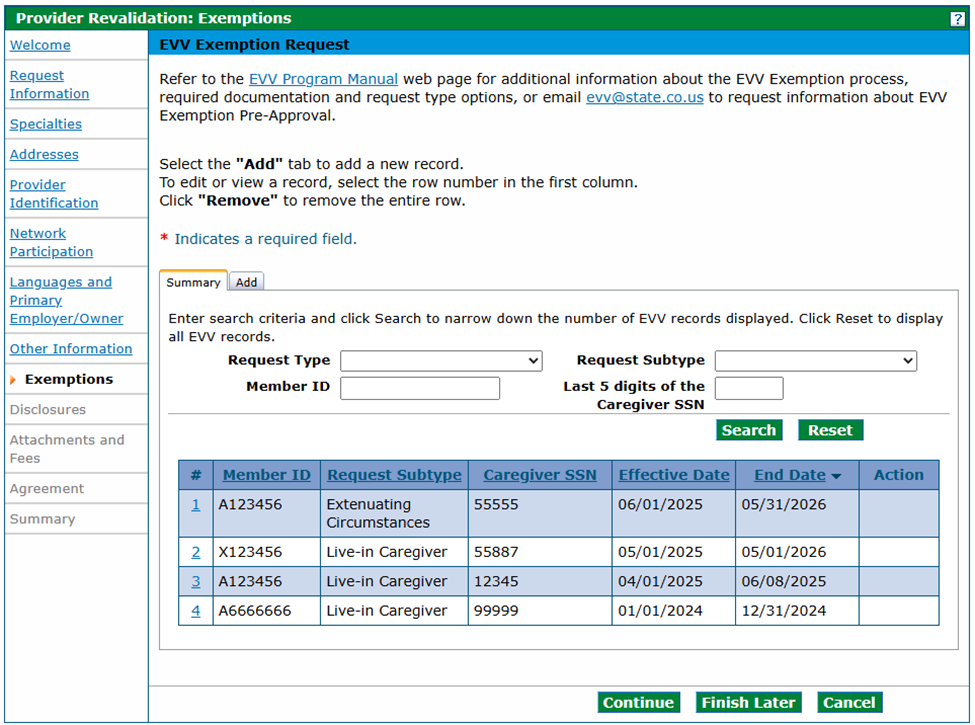
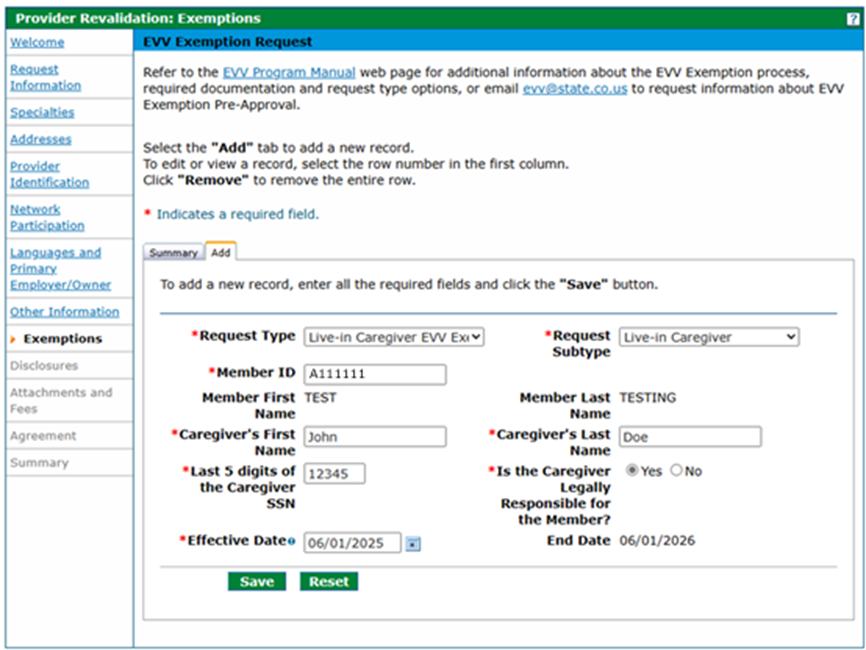
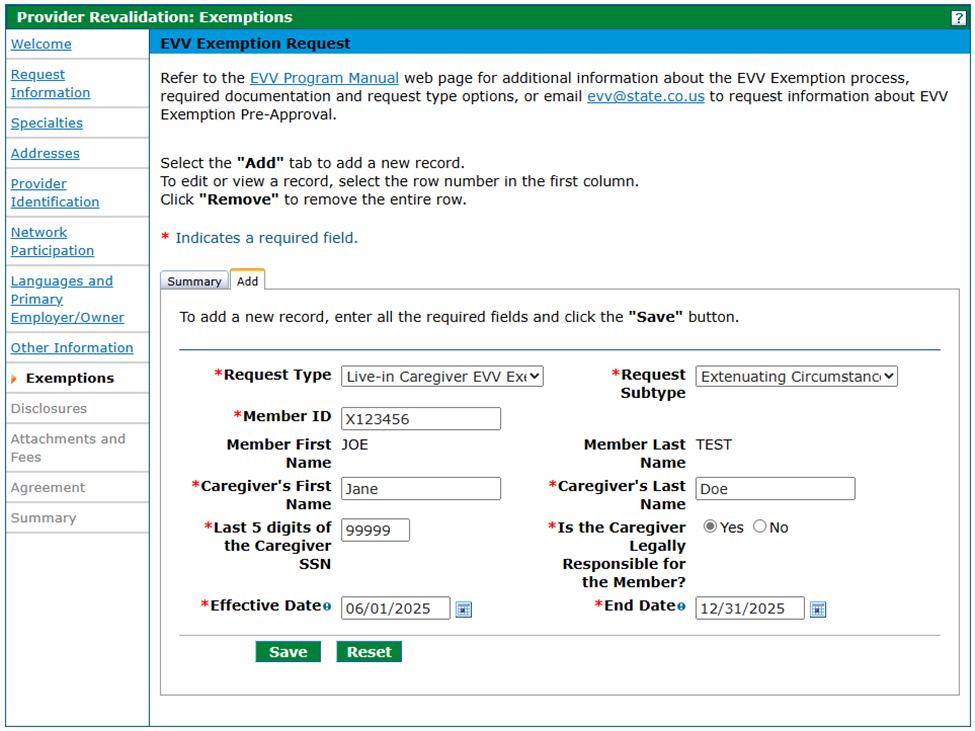
Electronic Visit Verification (EVV) providers can add a Live-in Caregiver record to the EVV Exemption Request panel by clicking the Add tab. Select Live-in Caregiver from the Request Type and Request Subtype drop-down lists.
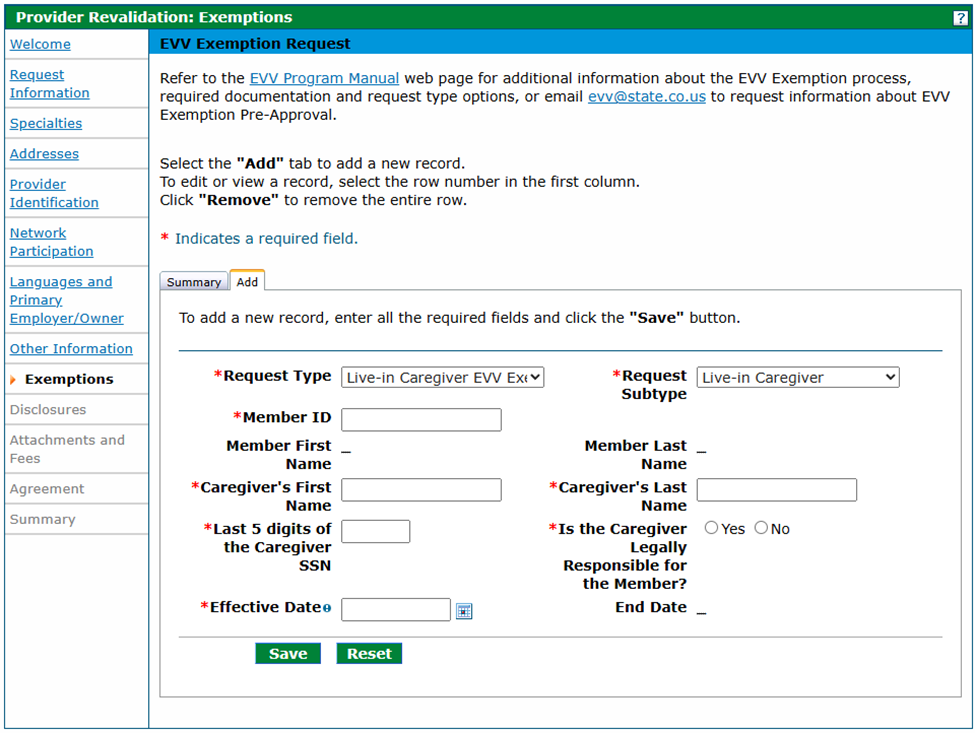
Click the Save button after the required data is entered.
The record will be added to the list on the Summary tab.
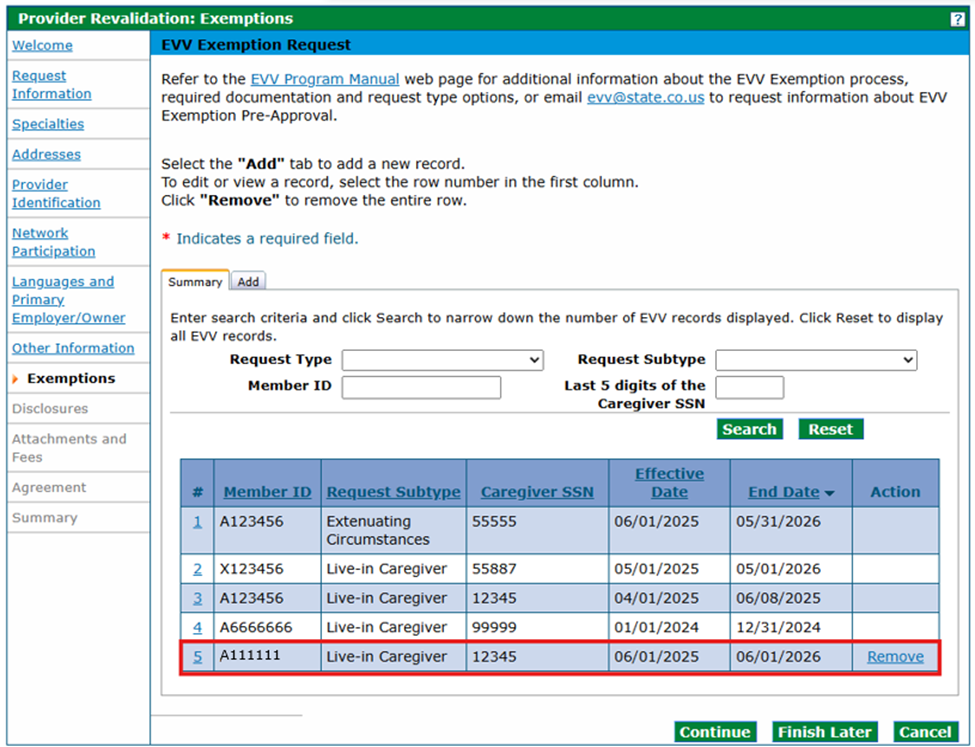
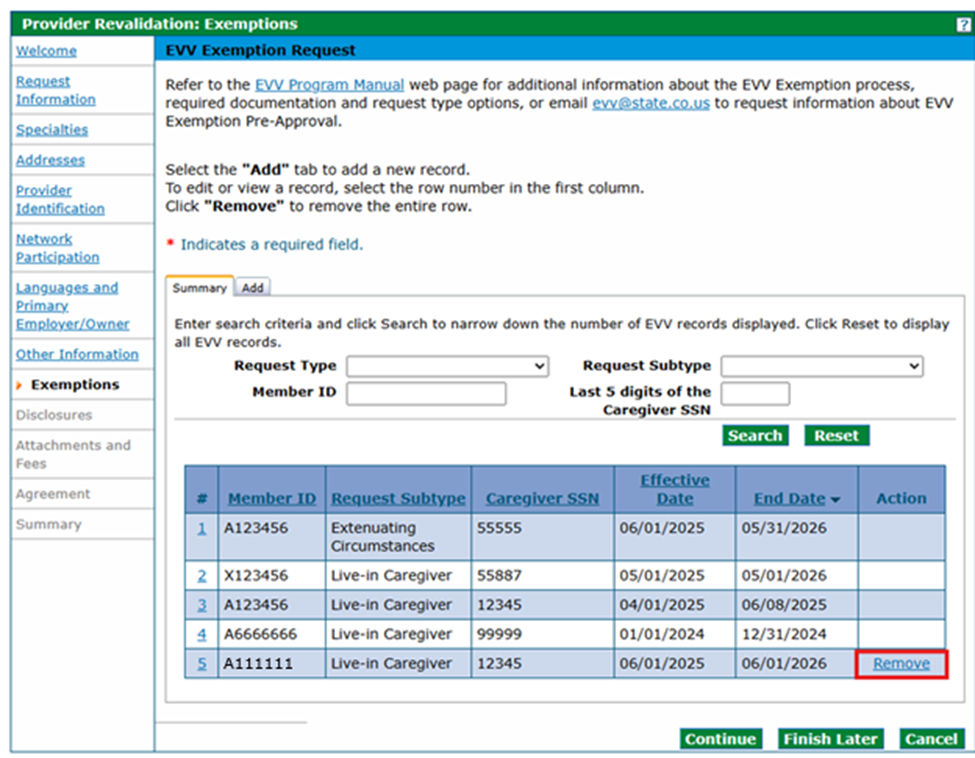
To remove a record from the list on the EVV Exemption Request panel, click the Remove link in the Action column.
An Extenuating Circumstances record can also be added in the EVV Exemption Request panel by clicking the Add tab. Select Live-in Caregiver from the Request Type drop down list and Extenuating Circumstances from the Request Subtype drop-down list.
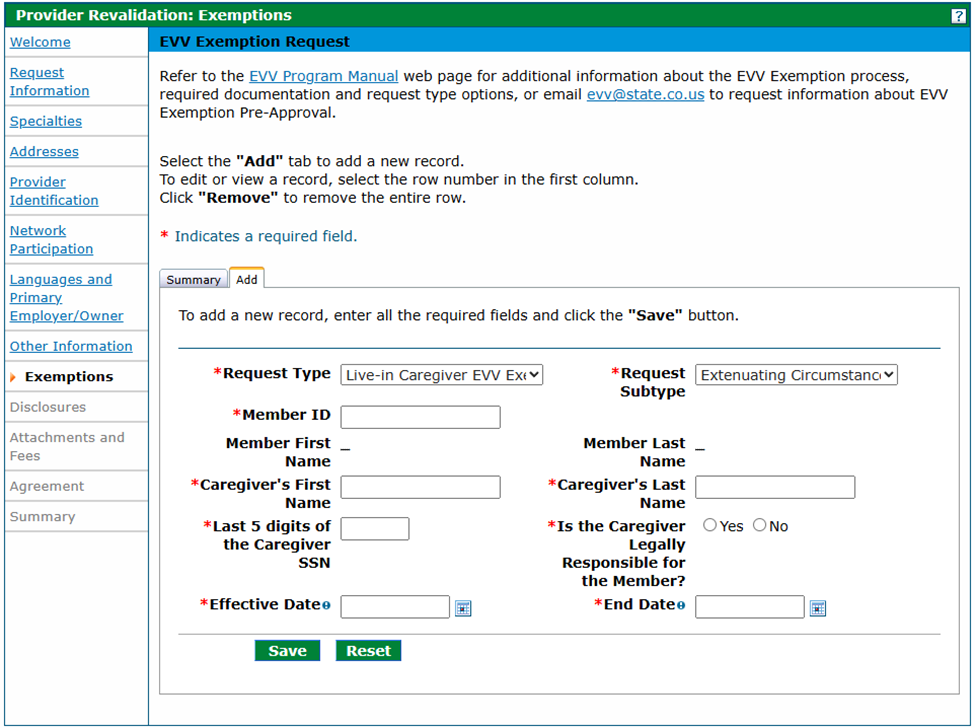
Click the Save button after the required data is entered.
- The record will be added to the list on the Summary tab.
To remove a record from the list on the EVV Exemption Request panel, click the Remove link in the Action column.
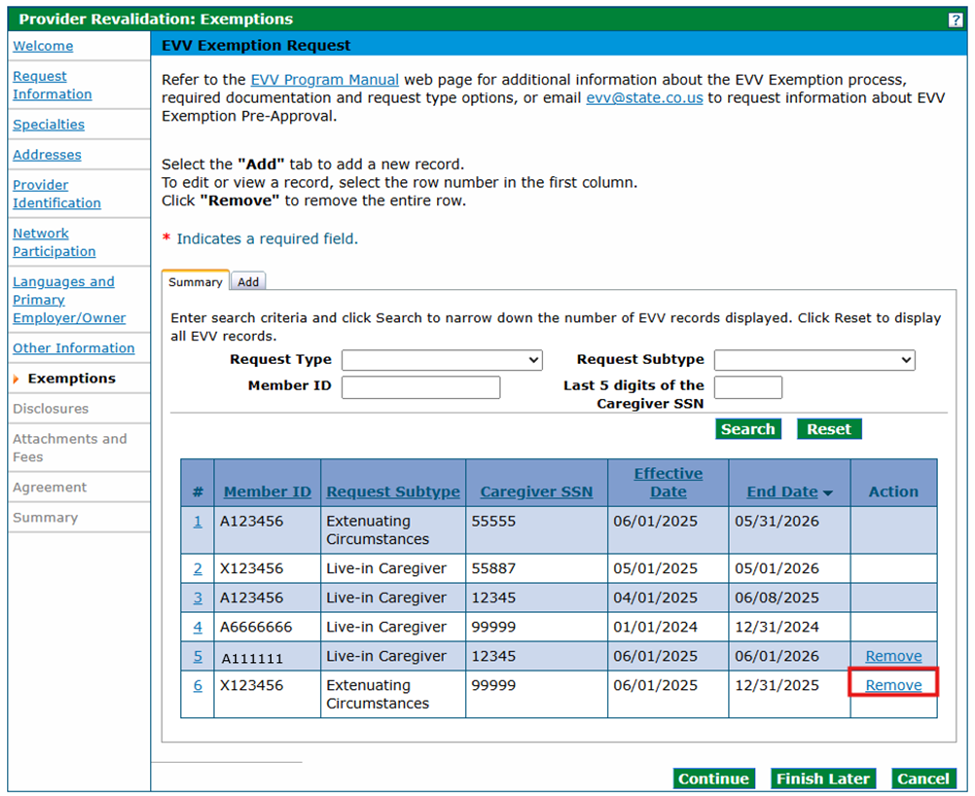
To remove a record from the list on the EVV Exemption Request panel, click the Remove link in the Action column.
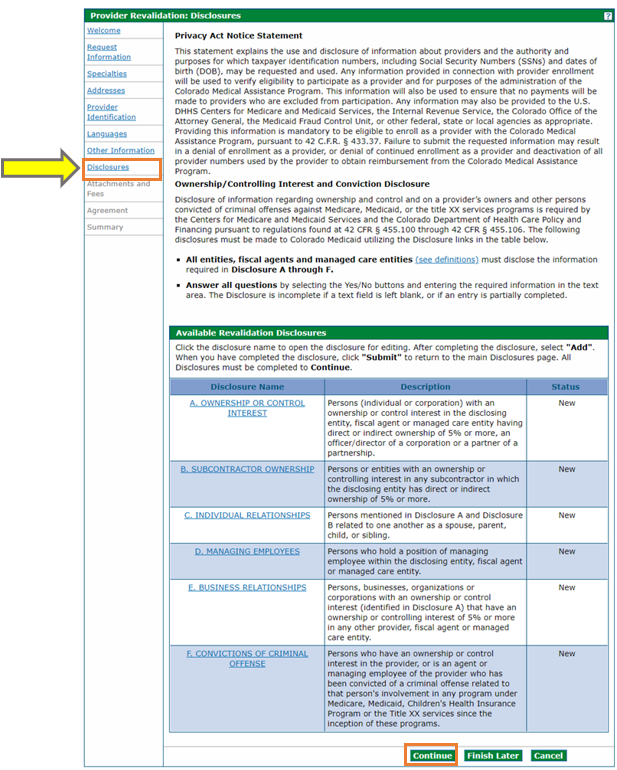
- Click the Continue button to move to the Disclosures panel.
Note: Each disclosure must be completed before continuing to the next panel.
Click the Continue button to move to the Attachments and Fees panel.
Note: Providers with the Fingerprinting option on the left panel will be directed to the Fingerprinting panel.
Review and update the information for each entity identified on the Fingerprinting panel, if applicable.
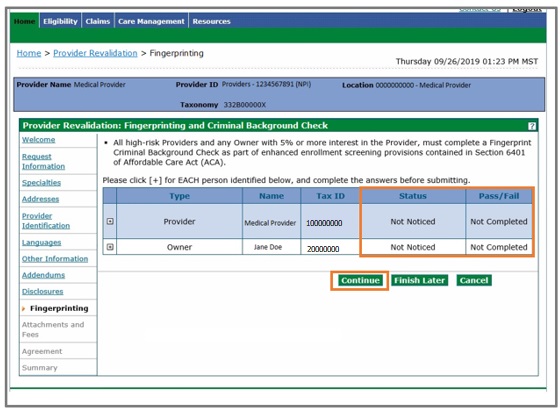
- Review and update the information for each entity identified on the Fingerprinting panel, if applicable.
- Click the Continue button to move to the Attachments and Fees panel.
Submit the applicable attachments.

Note: Providers are reminded to attach a copy of their license if the license information is added or updated on the revalidation application.
Note: Added attachments will not be saved and must be reattached before the application is submitted if the Finish Later button is clicked.
- Click the Continue button to move to the Agreement panel.
- Review the PPA, then click either the I Accept the Colorado BHA PPA or I Accept the Title XIX Payer PPA checkbox.
Sign the agreement by clicking the I Accept checkbox and entering the name of the person completing the application.
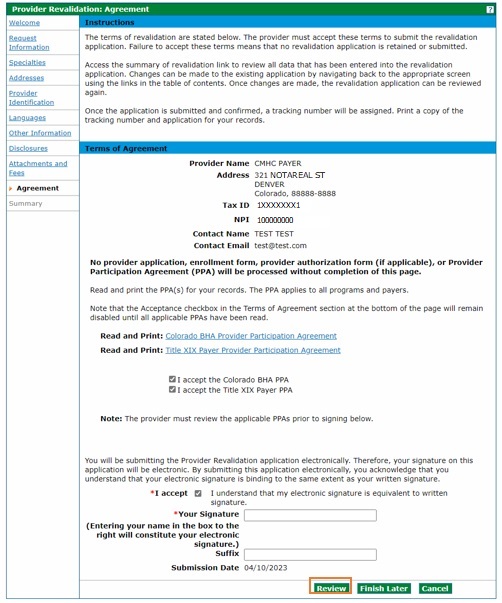
Note: The Review button becomes active after all required fields are completed.
- Click the Review button to move to the Summary panel.
- Review the revalidation updates on the Summary panel.
Click the Submit button once complete.
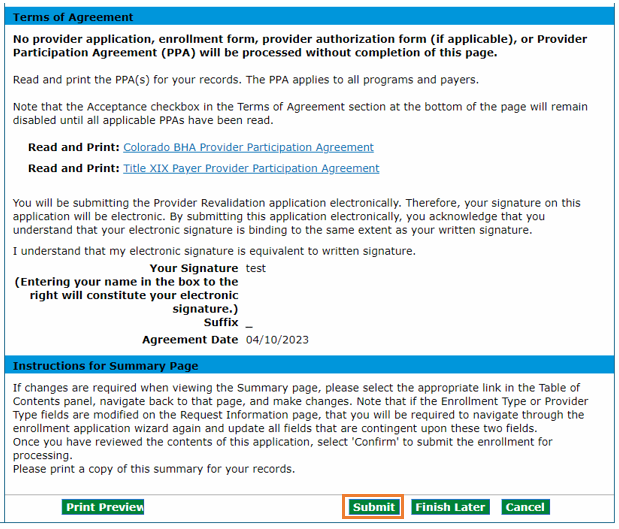
- Click Print Preview to view and print the entire revalidation application.
- Click the Submit button to submit the revalidation application.
Note: The user will be asked if a copy of the revalidation application has been printed for their records when the Submit button is clicked.
- Click OK if a copy has been printed or is not desired, or click Cancel to return to the application to print a copy. This is the final opportunity to print the application before submission.
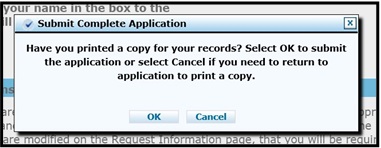
The tracking number is displayed on the final submission.
![]()
Returned Revalidation Application
Follow these steps if the revalidation application is returned for additional information.
- Log in to Provider Web Portal.
- Click Revalidation Application.
- Click Revise Revalidation Application.
Note: The Revise Revalidation Application link displays only if the application has been returned for additional information or updates.
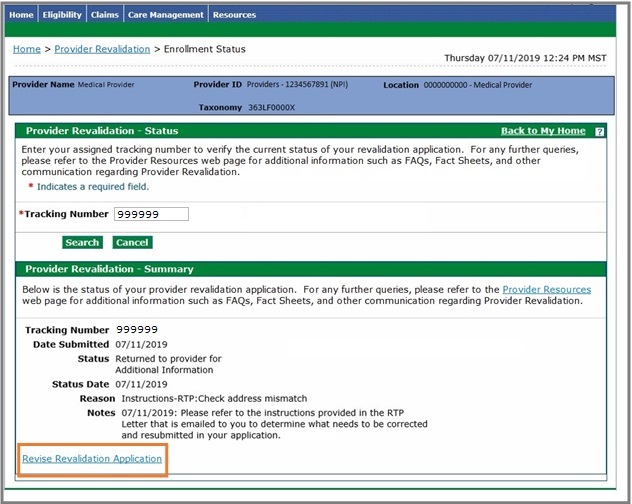
Make the necessary corrections listed in the provider letter and resubmit the application.
Check the Status of the Revalidation Application
Follow these steps to check the current status of the revalidation application:
- Log in to Provider Web Portal.
- Click Revalidation Application.
- Check the status of the revalidation request.

Need More Help?
Visit the Quick Guides web page to find all the Provider Web Portal Quick Guides.