Entering Other Insurance or Medicare Crossover Information
This Quick Guide covers when and how to enter other insurance information, such as Third-Party Liability (TPL)/commercial insurance, or Medicare crossover information.
Other insurance information should be entered on claims with TPL/commercial insurance. For claims billed first to Medicare, provide the Medicare crossover information.
About Crossover Claims
The term "crossover claim" may refer to a claim that is directly from Medicare and has been "crossed over" by Medicare to Health First Colorado (Colorado's Medicaid program) for processing. It also may refer to a provider-initiated claim submitted via the Provider Web Portal, by batch or by paper that contains Medicare claim information.
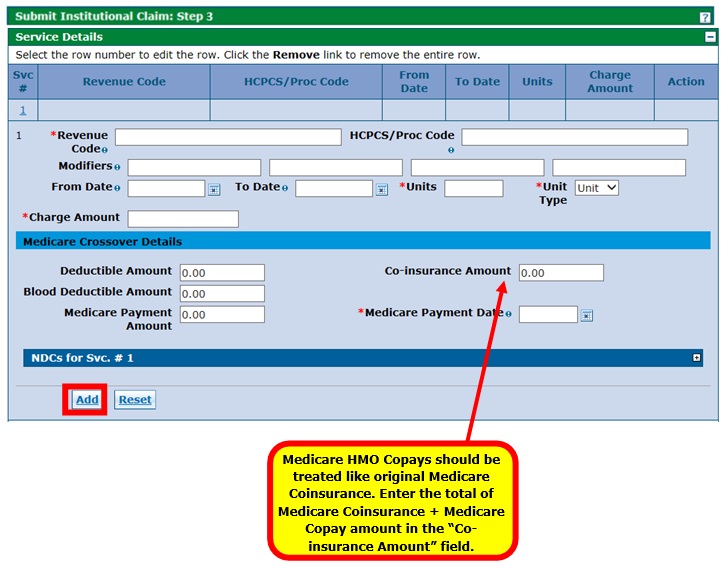
A crossover claim does not necessarily have to come directly from Medicare. Medicare Health Maintenance Organization (HMO) co-pays should be treated like original Medicare Coinsurance. Enter the total of Medicare Coinsurance and Medicare Co-pay amount into the Coinsurance Amount field under the Medicare Crossover Details section of the claim.
Medicare crossover information should be entered only for claims that were billed to Medicare first.
How to Use this Quick Guide
Identify the example which most closely matches your claim from the list below and then proceed to the appropriate page for instructions. The sample screens shown in this guide may vary depending on claim information.
- About the Billing Provider ID
The Billing Provider ID will be used for claims payment. If the Billing Provider ID is a National Provider Identifier (NPI), the Provider Web Portal automatically selects either the NPI that is effective on the "From Date" in the Service Details section or the From Date of the "Covered Dates" in the Claim Information section. It will insert that NPI into the "Billing Provider ID" field during Submit Claim: Step 3. - About the Service Facility Provider ID/Service Facility Provider Location ID
Completion of the Service Facility Provider ID/Service Facility Provider Location ID is conditional. If a provider has the same provider type for multiple service locations, the provider should use the service location’s unique NPI in the Billing Provider ID field. The provider may use the unique NPI in the Service Facility ID field as well if they choose. If the NPI for the billing provider is different than the location where the service was rendered, the Service Facility ID/Service Facility Provider Location ID field must be completed. - About the Payer
Selecting a Payer is required. The Payer is the program in which the provider is enrolled. “Title XIX” is used for Health First Colorado or Child Health Plan Plus (CHP+) through the Department of Health Care Policy & Financing.
Select from one of the two topics below to follow specific instructions:
Entering Other Insurance Information on a Claim
Professional Claim with TPL
- Log in to the Provider Web Portal.
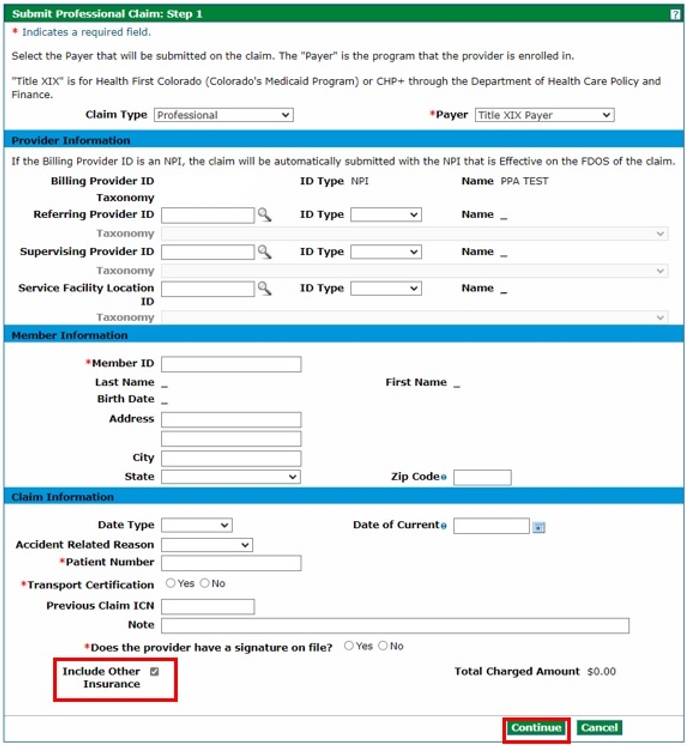
- On the Submit Professional Claim: Step 1 page, select "Professional" from the Claim Type drop-down. Complete all applicable fields and then check the "Include Other Insurance" box under the Claim Information section. Click "Continue."
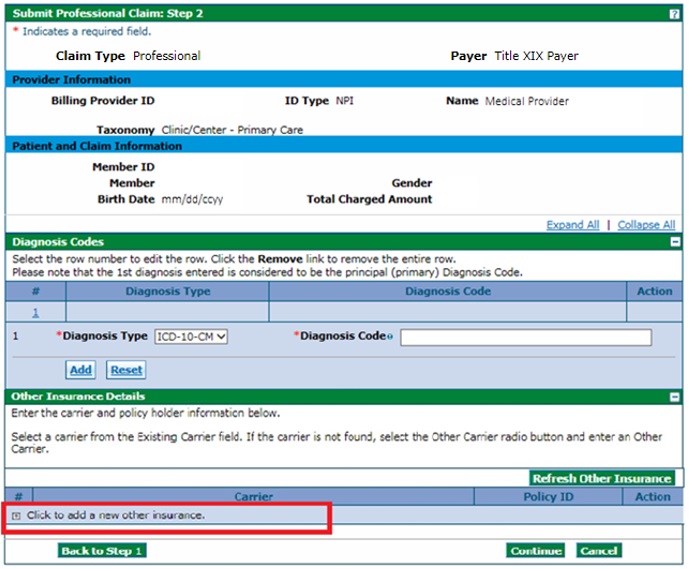
- On the Submit Professional Claim: Step 2 page under the Other Insurance Details section, click [+] to add new other insurance information.
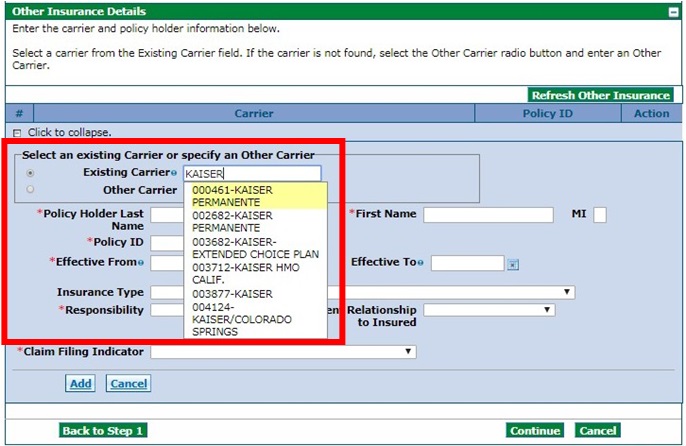
- Enter the insurance company name in the Existing Carrier field, and then select the appropriate carrier from the drop-down list. If the carrier is not found, select Other Carrier and type in the Carrier Name.
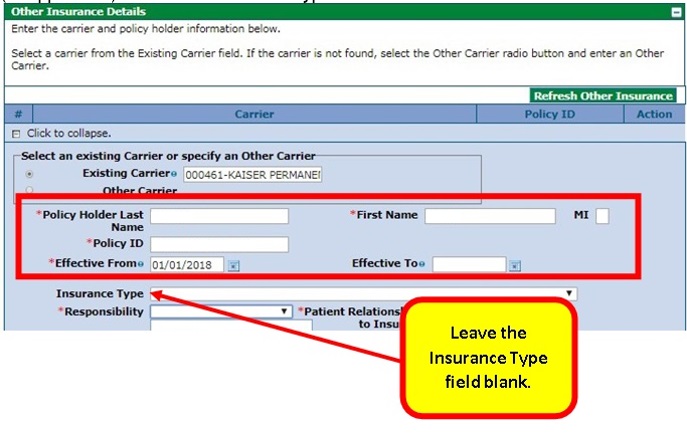
- Enter the Policy Holder Last Name, First Name, Policy ID and Effective Dates (as applicable). Leave the Insurance Type field blank.
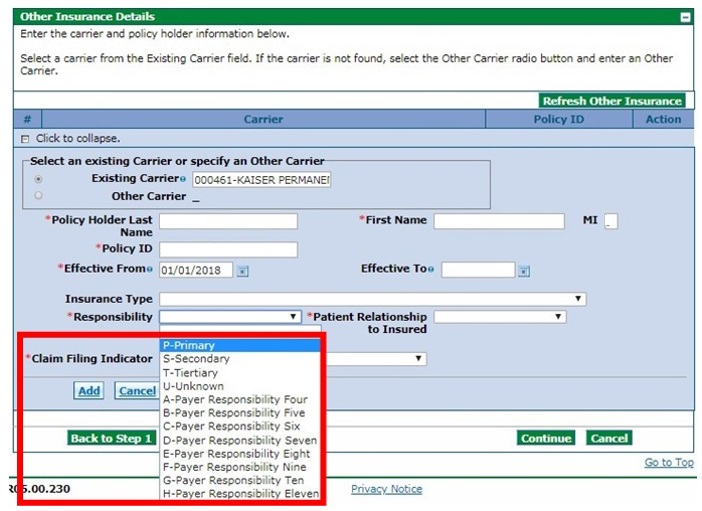
Select the payer responsibility from the drop-down list.
Note: Health First Colorado is the payor of last resort.
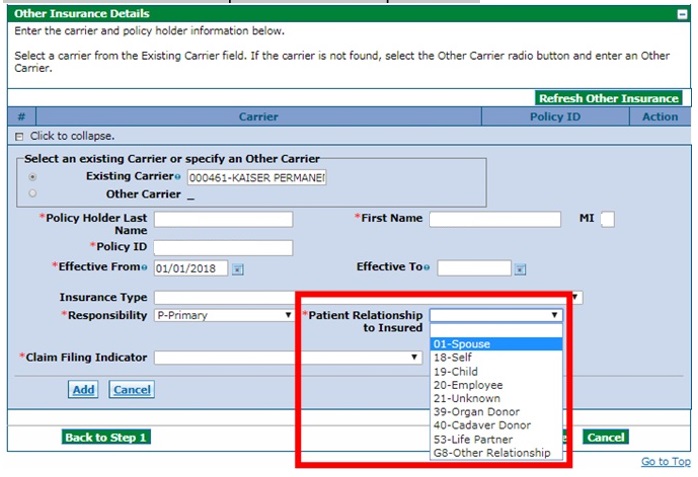
- Select the relationship of the covered individual to the responsible individual from the Patient Relationship to the Insured drop-down list.
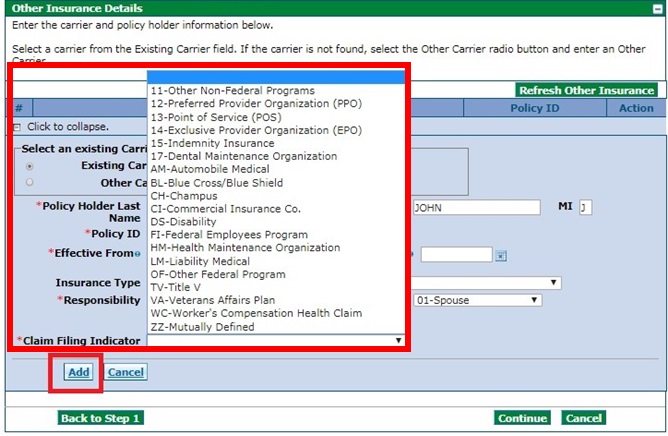
- Select the Claim Filing Indicator from the drop-down list, and then click the "Add" button.
- Review the next screen to ensure the other insurance information has been saved. If finished adding other insurance information, click "Continue." If more other insurance information needs to be added, click [+] and repeat the applicable steps.

- Proceed to the Submit Professional Claim: Step 3 page and complete all applicable fields in the Service Details section. Under Other Insurance for Service Detail, enter the applicable information. See below for information on what to enter when the TPL paid, denied or applied the entire amount to deductible.
- TPL Paid
If the TPL paid, enter the applicable amounts in the Paid Amount field and the Paid Units field. Enter the payment date in the Paid Date field.
Once complete, click "Submit." - TPL Denied
If the TPL was denied, enter "0.00" in the Paid Amount field and "1" in the Paid Units field. Enter the denial date in the Paid Date field.
Once complete, click "Submit." - TPL Applied to Deductible
When the TPL applied the entire amount to patient responsibility, and a prior authorization is required for the service, the Explanation of Benefits (EOB) from the TPL must be attached to the claim for verification. Enter "0.00" in the Paid Amount field and "1" in the Paid Units field. Enter the Explanation of Benefits (EOB) date in the Paid Date field. Once complete, click “Submit.”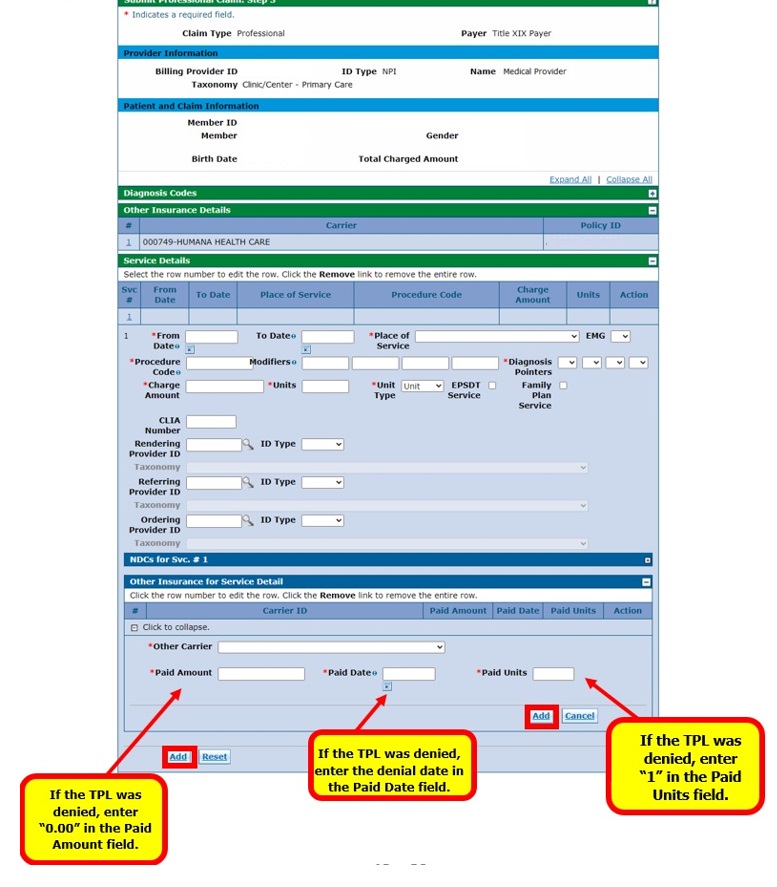
- TPL Paid
- Repeat the above process until all service detail lines have been added. Once complete, click "Submit."
Institutional Claim with TPL
- Log in to the Provider Web Portal.
- On the Submit Institutional Claim: Step 1 page, select "Inpatient,” “Outpatient” or “Long-Term Care" from the Claim Type drop-down and complete all applicable fields.
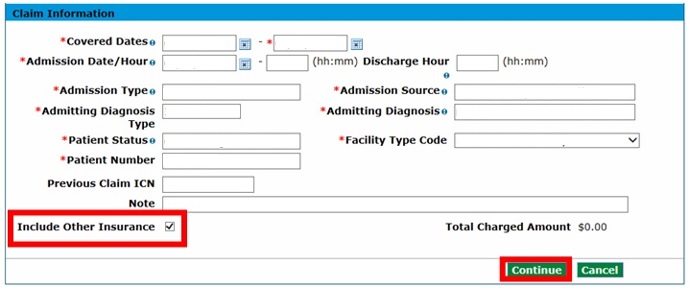
- Check the "Include Other Insurance" box under the Claim Information section and then click "Continue."
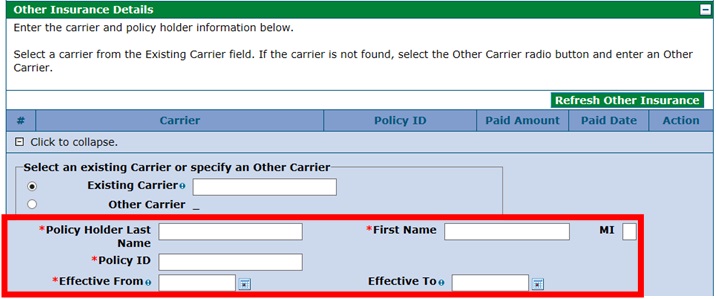
- On the Submit Institutional Claim: Step 2 page under the Other Insurance Details section, enter the insurance company name in the Existing Carrier field, and then select the appropriate carrier from the drop-down list. If the carrier is not found, select Other Carrier and type the Carrier Name.

- Enter the Policy Holder Last Name, First Name, Policy ID and Effective Dates.
- Proceed to the Submit Institutional Claim: Step 3 page and complete all applicable fields in the Service Details section. Under Other Insurance for Service Detail, enter the applicable information. See below for information on what to enter when the TPL paid, denied or applied the entire amount to deductible.
- TPL Paid
If the TPL paid, enter the applicable amounts in the Paid Amount field and the Paid Units field. Enter the payment date in the Paid Date field.
Once complete, click "Submit." - TPL Denied
If the TPL was denied, enter "0.00" in the Paid Amount field and "1" in the Paid Units field. Enter the denial date in the Paid Date field.
Once complete, click "Submit." - TPL Applied to Deductible
When the TPL applied the entire amount to patient responsibility, and a prior authorization is required for the service, the Explanation of Benefits (EOB) from the TPL must be attached to the claim for verification. Enter "0.00" in the Paid Amount field and "1" in the Paid Units field. Enter the Explanation of Benefits (EOB) date in the Paid Date field. Once complete, click “Submit.”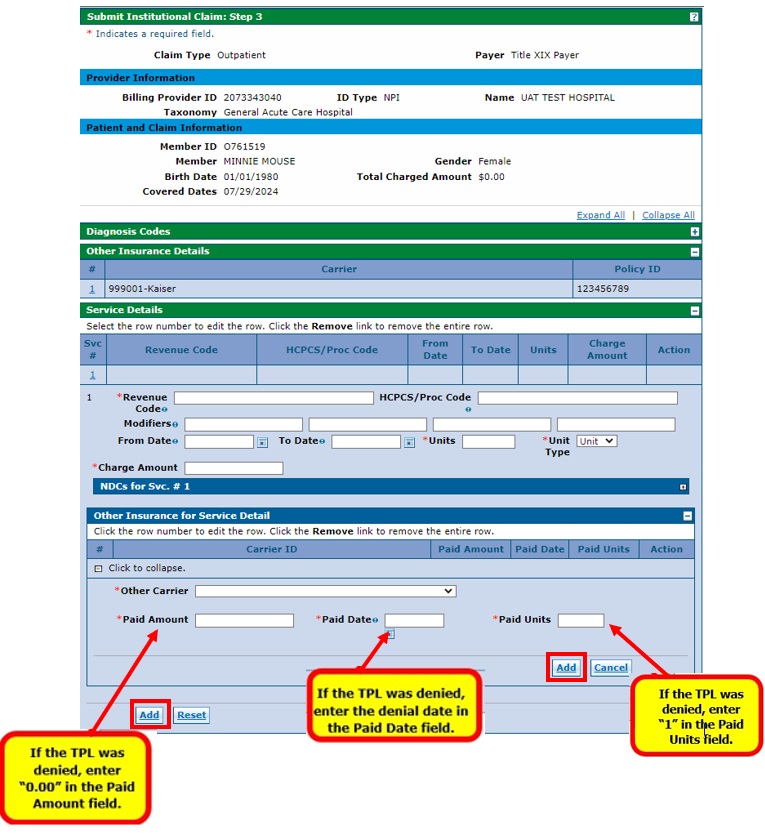
- TPL Paid
- Repeat the above process until all service detail lines have been added. Once complete, click "Submit."
Entering Medicare Crossover Information on a Claim
Medicare crossover information should be entered only for claims that were billed to Medicare first.
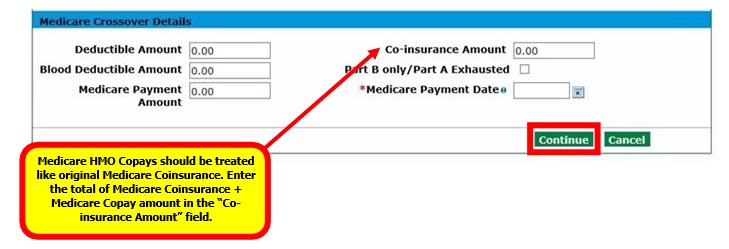
Reminder: A crossover claim does not necessarily have to come directly from Medicare. Medicare Health Maintenance Organization (HMO) co-pays should be treated like original Medicare Coinsurance. Enter the total of Medicare Coinsurance and Medicare Co-pay amount into the Coinsurance Amount field under the Medicare Crossover Details section of the claim.
Professional Claim with Medicare (Crossover)
- Log in to the Provider Web Portal.
On the Submit Professional Claim: Step 1 page, select "Crossover Professional" from the "Claim Type" drop-down and complete all applicable fields under the Provider Information, Member Information and Claim Information sections.
Do not check the "Include Other Insurance" box under the Claim Information section. Click "Continue."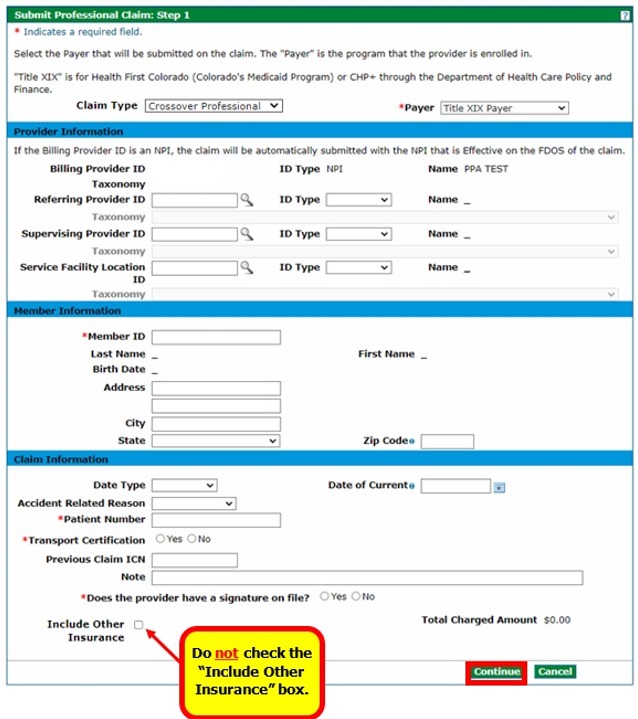
- On the Submit Professional Claim: Step 2 page, complete all applicable fields under the Diagnosis Codes section and then click "Add." Repeat until all diagnosis codes have been added, then click "Continue."
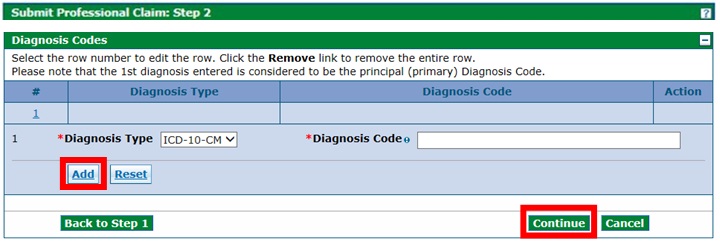
- On the Submit Professional Claim: Step 3 page, under the Medicare Crossover Details section, enter the associated Medicare crossover information for each service line. Click "Add" to repeat the process until all service detail lines have been added. Once complete, click "Submit."

Institutional Inpatient Claim with Medicare (Crossover)
- Log in to the Provider Web Portal.
On the Submit Institutional Claim: Step 1 page, select "Crossover Inpatient" from the "Claim Type" drop-down and complete all applicable fields under the Provider Information and Member Information sections.
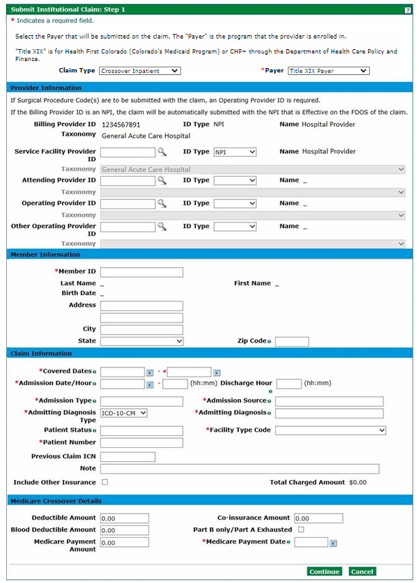
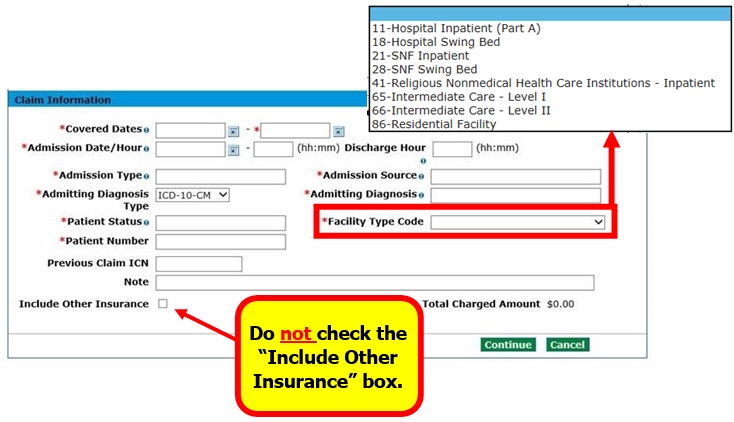
- Proceed to the Claim Information section and complete all applicable fields. Select the appropriate Facility Type Code from the drop-down list. Do not check the "Include Other Insurance" box under the Claim Information section.
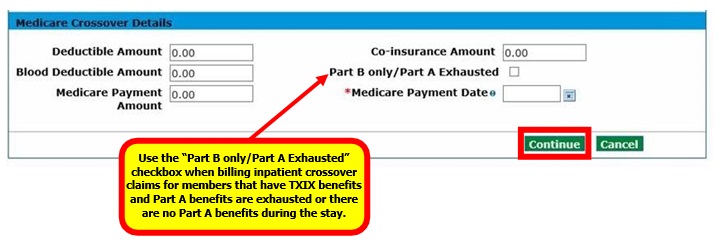
- Proceed to the Medicare Crossover Details section, complete all applicable fields, and then click "Continue." See the next section for instructions on Part B Only Crossover.
Institutional Inpatient Claim with Medicare (Part B Only Crossover)
Follow Steps 1 and 2 from the Institutional Inpatient Claim with Medicare (Crossover) section above. In the Medicare Crossover Details section, complete all applicable fields and select the “Part B only/Part A Exhausted” checkbox.
Click "Continue."
Institutional Outpatient Claim with Medicare (Crossover)
- Log in to the Provider Web Portal.
- On the Submit Institutional Claim: Step 1 page, select "Crossover Outpatient" from the "Claim Type" drop-down and complete all applicable fields.
Do not check the "Include Other Insurance" box under the Claim Information section.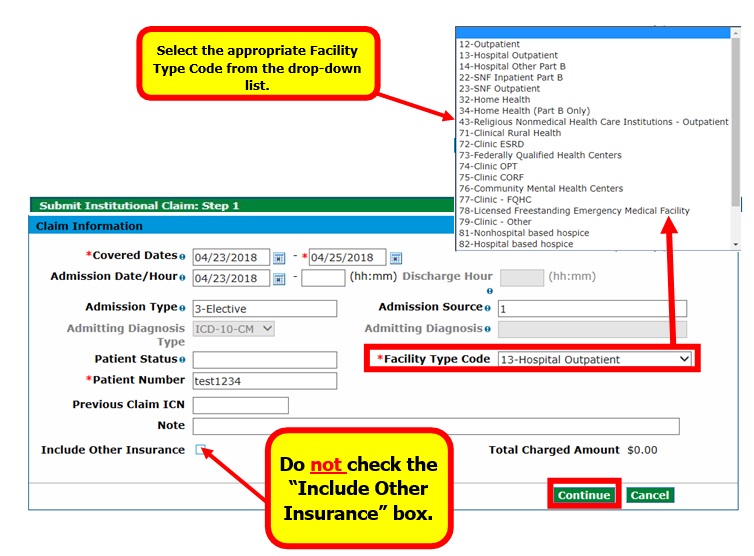
- Proceed to the Medicare Crossover Details section, complete all applicable fields, and then click "Continue."
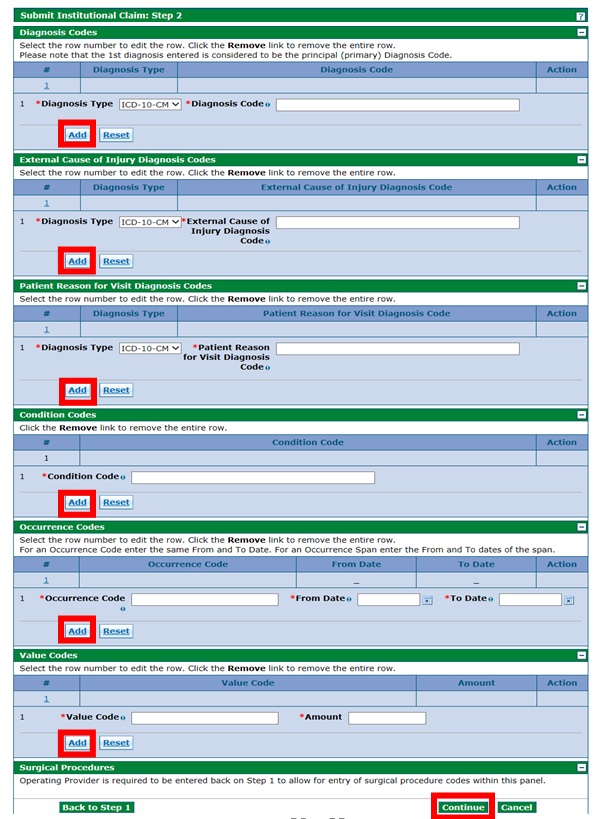
- On the Submit Institutional Claim: Step 2 page, complete all applicable fields and click "Add." Repeat the process as needed for each detail line. Once complete, click "Continue."
- On the Submit Institutional Claim: Step 3 page, complete all applicable fields under the Service Details section. Enter the associated Medicare Crossover Details for each service line. Click "Add" to repeat the process until all service detail lines have been added. Click "Submit" once completed.
Need More Help?
Visit the Quick Guides web page to find all the Provider Web Portal Quick Guides.