Add or Change a National Provider Identifier (NPI)
Providers must use Provider Maintenance, the area of the Provider Web Portal used to update provider account information, to add a unique National Provider Identifier (NPI) to a service location in order to comply with House Bill (HB) 18-1282, the Colorado NPI Law.
Providers should not submit a new enrollment application.
- Login to Provider Web Portal.
- Click Provider Maintenance.

- Click Provider Maintenance again.

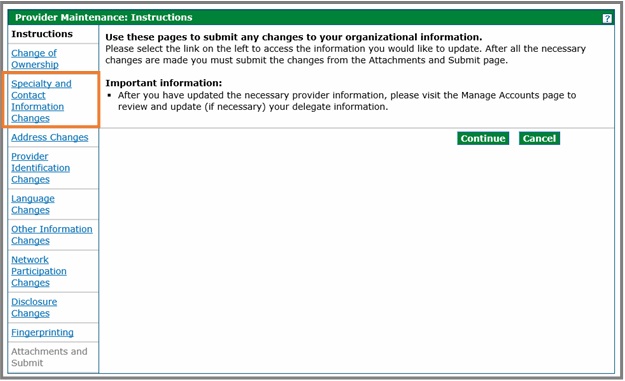
- Click on the Specialty and Contact Information Changes page.

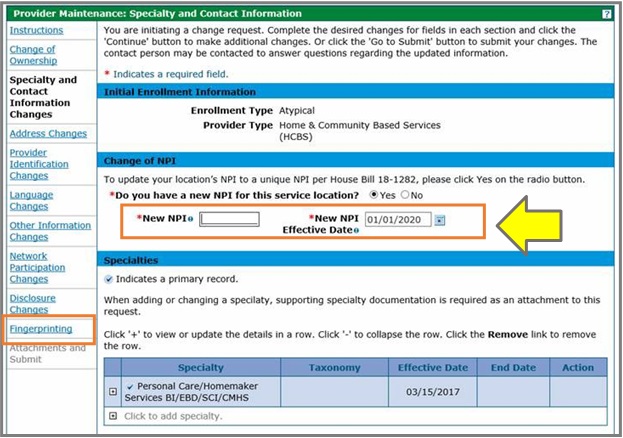
- Refer to the Change of NPI section. The question "Do you have a new NPI for this service location?" is defaulted to No.

If an NPI needs to be updated, select the "Yes" button. When "Yes" is selected, two (2) new fields will be visible: New NPI and New NPI Effective Date.
The New NPI must be unique and cannot be currently active in Colorado interChange. The New NPI will be verified after it is entered, and it must be active in the NPPES NPI Registry. At least one (1) Taxonomy must be on file for the provider record that matches any of the taxonomies listed in the NPPES NPI Registry for the New NPI. Taxonomies can be added in the Additional Taxonomies section at the bottom of this panel.
Note: Providers cannot enter a date prior to the current date. The National Provider Identifier (NPI) Backdate Form, located on the Provider Forms web page under the Provider Enrollment & Update Forms drop-down menu, is required to change an effective date to a past date when adding a new unique NPI to an existing enrollment record. Complete the form and upload it as an attachment with the request to add a new unique NPI.

After entering the New NPI and the New NPI Effective Date, click the "Continue" or "Go to Submit" button.

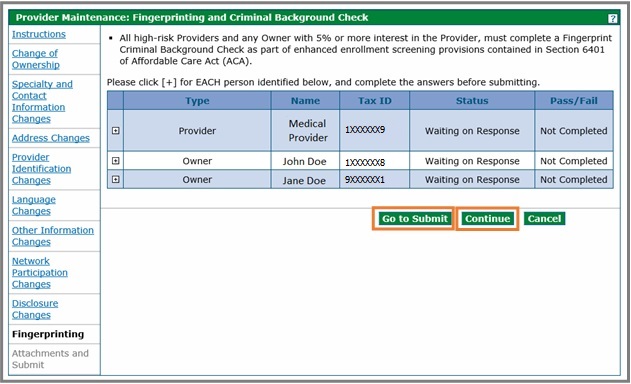
Note: Users with the Fingerprinting page option on the left side (see image above) will always be directed to the Fingerprint page (see image below) when Go to Submit is clicked.
From the Fingerprinting page, click the "Go to Submit" or "Continue" button to go to the Attachments and Submit page.

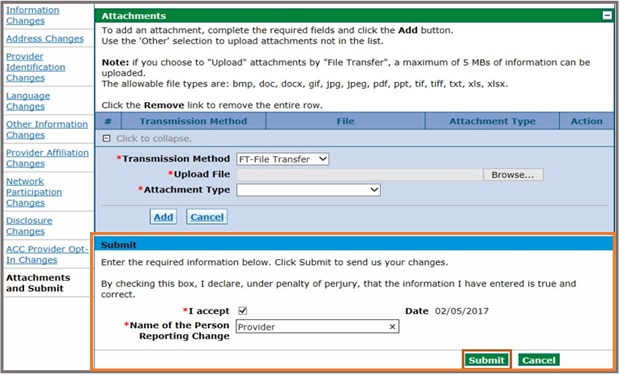
- From the Attachments and Submit page, sign by entering the Name of the Person Reporting the Change and then click the Submit button.

Remember to upload the backdate form when requesting a backdated NPI effective date. - Retain tracking number.

Check the status of an update request.
Click the Provider Maintenance Status link.

Enter the Tracking Number for the update request, and click Search.

View Status details

Need More Help?
Visit the Quick Guides web page to find all the Provider Web Portal Quick Guides.